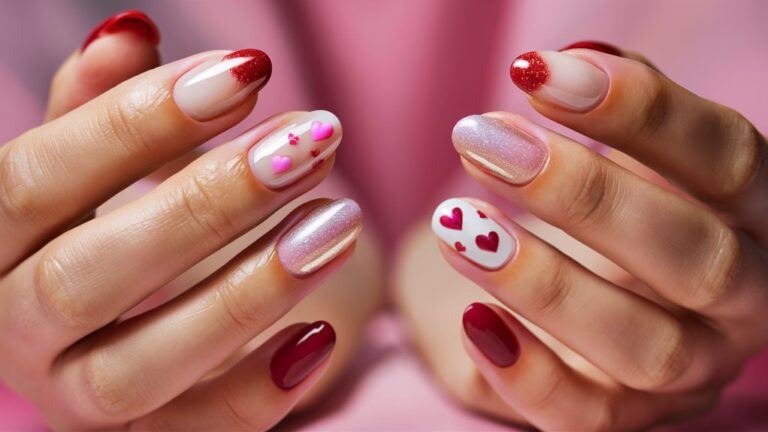
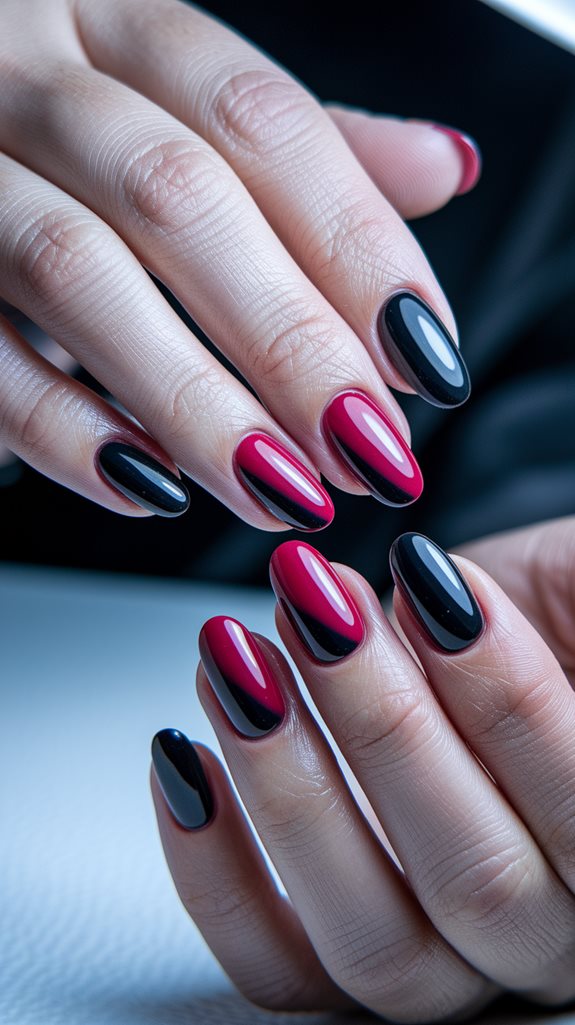
27 Red and Black Nails Design and Ideas
Explore a variety of red and black nail designs, from the timeless Classic Red and Black French Tips using OPI’s “Big Apple Red” and Essie’s “Licorice,” to striking Red and Black Ombres with a sponge for seamless blending. For precision, incorporate geometric patterns with striping tape or thin brushes.
Enhance durability and shine with a high-gloss top coat. Dive into specific techniques such as marble effects or checkerboards to elevate your nail art game even further.
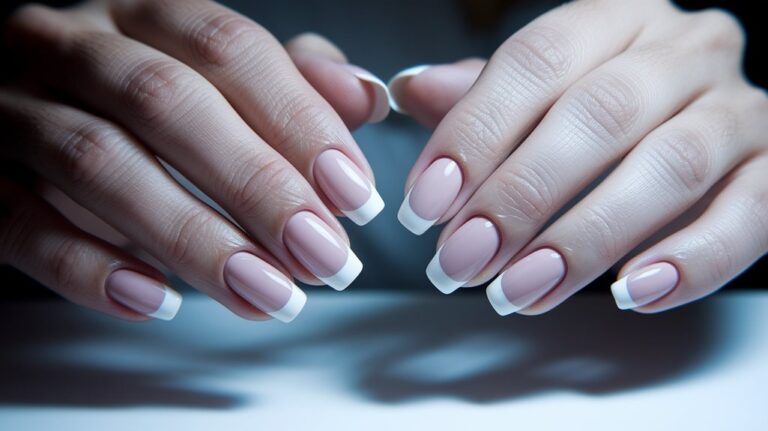
Classic Red and Black French Tips
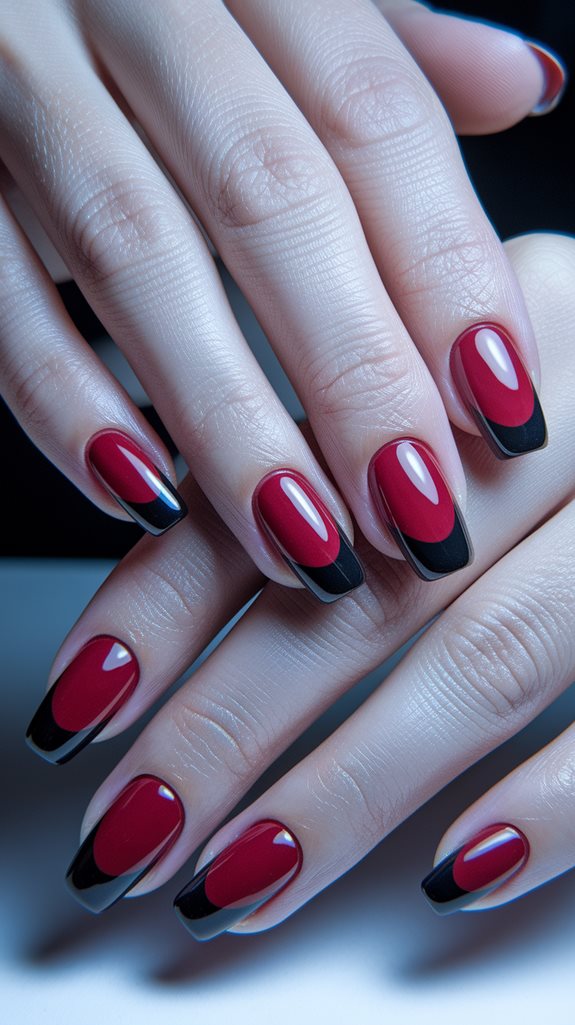
For a timeless yet bold look, classic red and black French tips are a perfect choice. Begin by applying a quality base coat to protect your nails.
Use a vibrant red polish, such as OPI’s “Big Apple Red,” to adorn the nail bed, allowing it to dry completely.
For the tips, use a precision brush or French tip guides with a highly pigmented black polish like Essie’s “Licorice” for sharp lines. Apply the black polish to the tips, ensuring clean, even coverage.
Seal and enhance the striking contrast with a high-gloss top coat, showcasing your style with confidence and flair.
Bold Red and Black Ombre
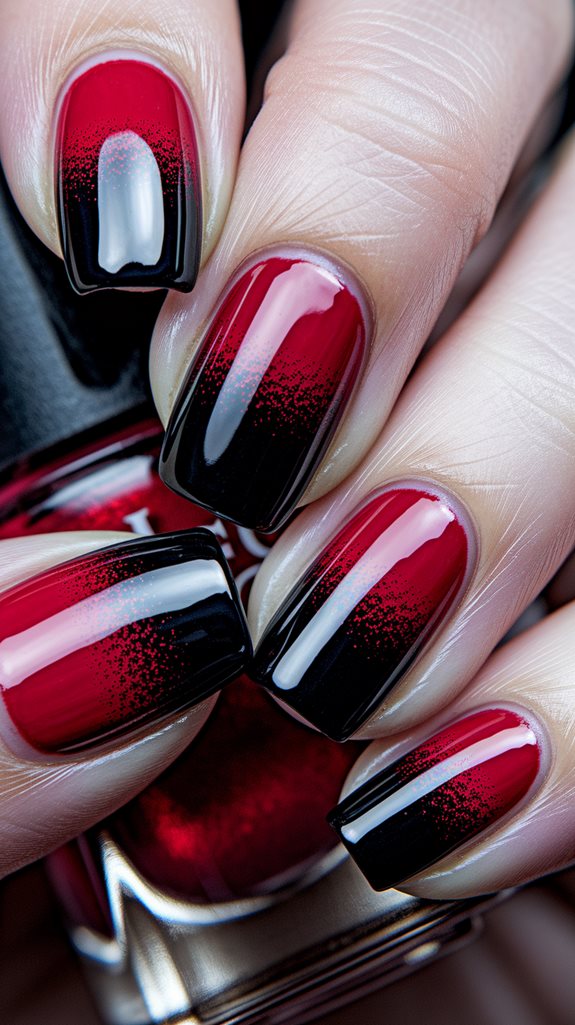
The bold red and black ombre design offers a modern twist to your nail art repertoire.
Begin by applying a base coat to protect your nails. Use a sponge to blend bold red and black nail polishes, creating a seamless gradient effect from the tip to the center of the nail.
For precision, apply tape around your nails to avoid unwanted polish on your skin.
Seal your design with a high-gloss topcoat to enhance the colors and add durability.
Try OPI’s “Big Apple Red” for the bold red and Essie’s “Licorice” for the black accent, delivering a striking and sophisticated look that’s sure to turn heads.
Geometric Patterns in Red and Black
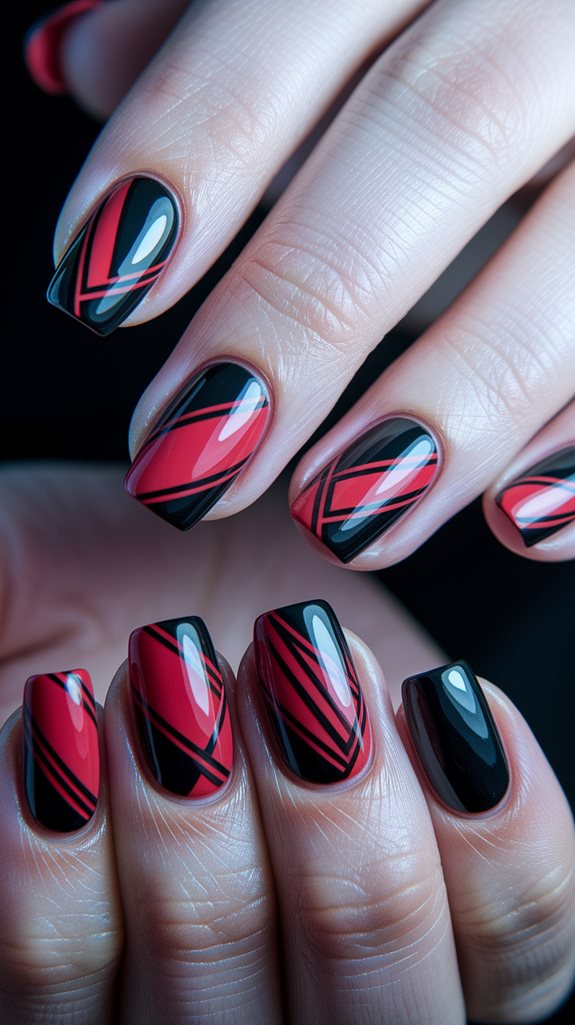
Geometric patterns in red and black provide a bold and modern aesthetic for your nails, blending precision with striking contrast. Start by selecting a high-quality red and black nail polish, such as OPI’s “Big Apple Red” and “Black Onyx”.
Utilize a thin nail art brush or striping tape to create clean lines and abstract shapes like triangles, squares, and intersecting lines for a captivating geometric effect.
To add depth, apply a matte top coat for a contemporary touch or a glossy one to intensify the colors. Incorporate dotting tools to design small circles within the abstract shapes for added detail and dimension.
Ensure each layer is fully dry before proceeding to the next to preserve sharp, clean lines.
Red and Black Marble Effect
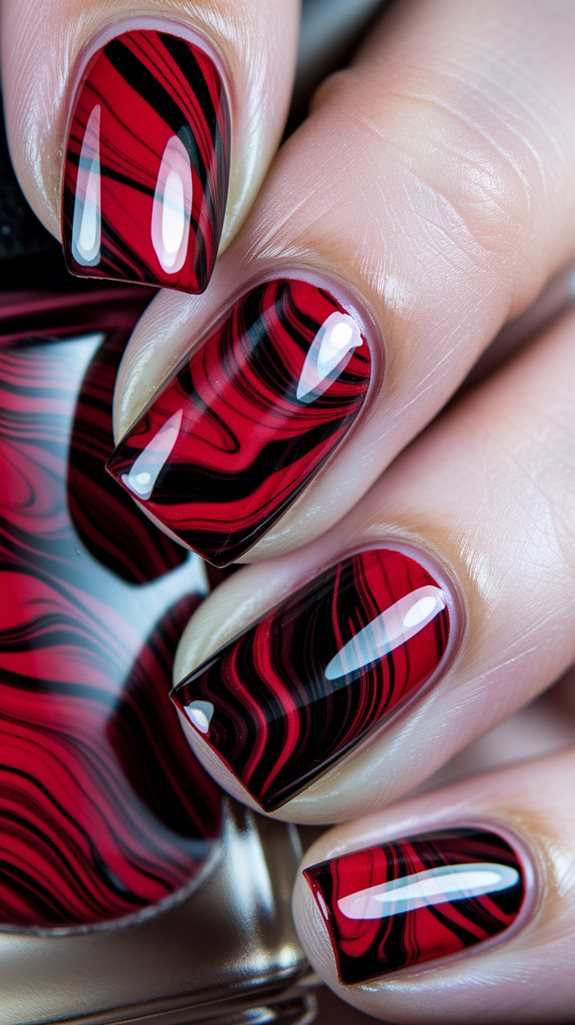
Achieve a sophisticated and artistic look with a red and black marble effect on your nails.
Begin with a protective base coat and then apply a rich red polish, such as OPI’s Big Apple Red.
Add black polish in small sections, using a thin nail art brush to create swirling patterns that blend red and black seamlessly.
Use a toothpick to drag through the colors for a fluid, organic appearance that embodies elegance and creativity.
Finish with a glossy top coat to enhance the vibrancy and longevity of the design.
Brands like Essie or Sally Hansen offer shades that make your nails stand out as unique art pieces.
Matte Red and Glossy Black Combo
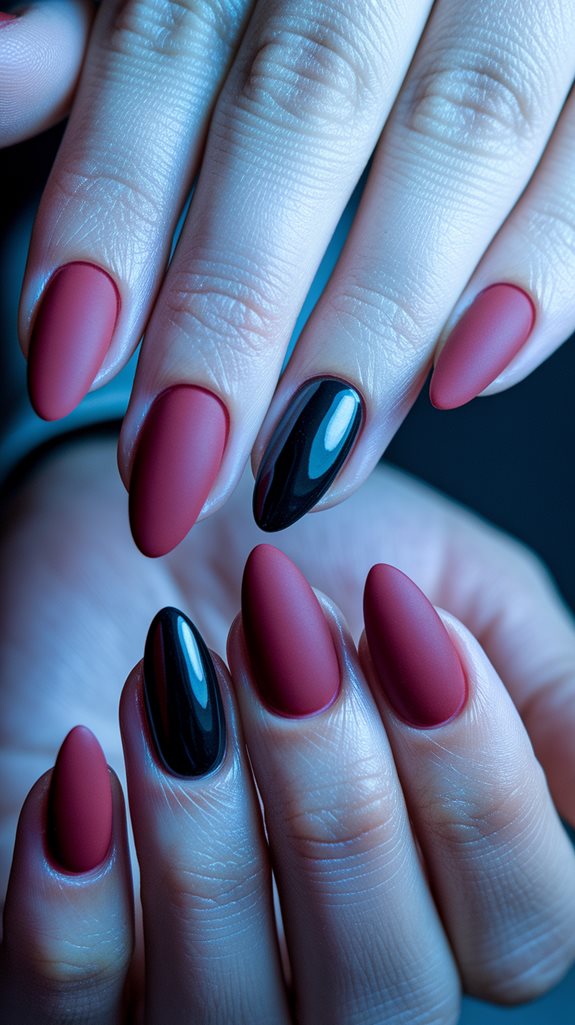
The matte red and glossy black combo elevates your nail art to a sophisticated level, creating a stunning visual contrast.
Starting with a base coat ensures nail protection and longevity. The use of a high-quality matte red polish provides a durable and elegant matte finish, setting the stage for striking nail art.
For the glossy element, a sleek black polish adds depth and contrast to the design. Painting accent nails or creating intricate patterns with a fine nail art brush enhances the overall look.
To amplify the gloss, apply a top coat to the glossy sections, achieving a balanced blend of matte and shine.
Red and Black Animal Print
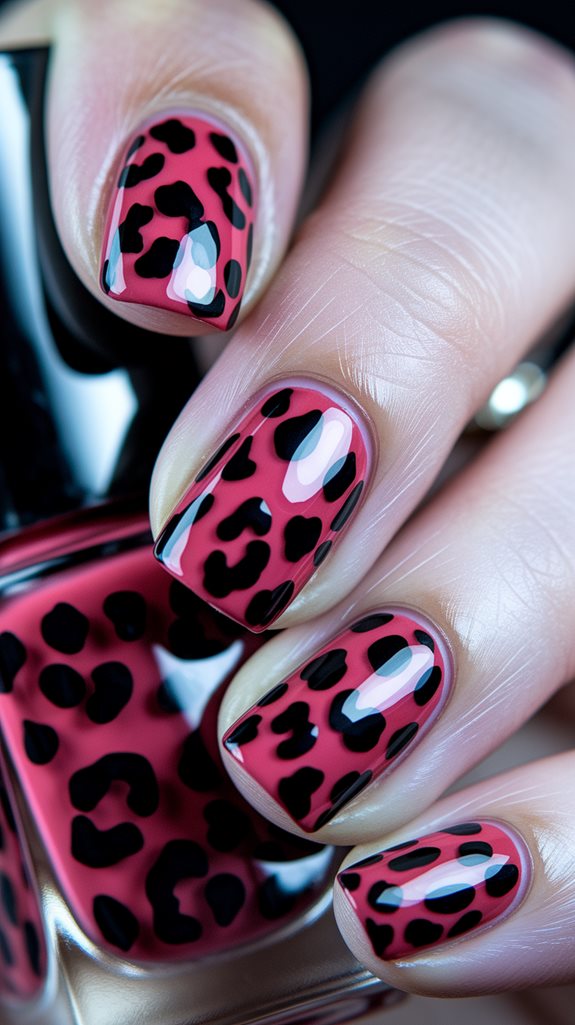
A red and black animal print nail design offers a bold and stylish flair to your look.
Start by applying a base coat to protect your nails, followed by a vibrant red polish like OPI Big Apple Red for a striking foundation.
Once dry, use a precision nail art brush and a jet-black polish such as Essie Licorice to create fierce animal patterns like leopard spots or zebra stripes.
To enhance the design, incorporate a dotting tool for intricate details that add dimension.
Finish with a high-gloss topcoat, like Seche Vite, for long-lasting wear and a stunning finish.
This combination results in nails that exude untamed elegance.
Glittery Red and Black Accents
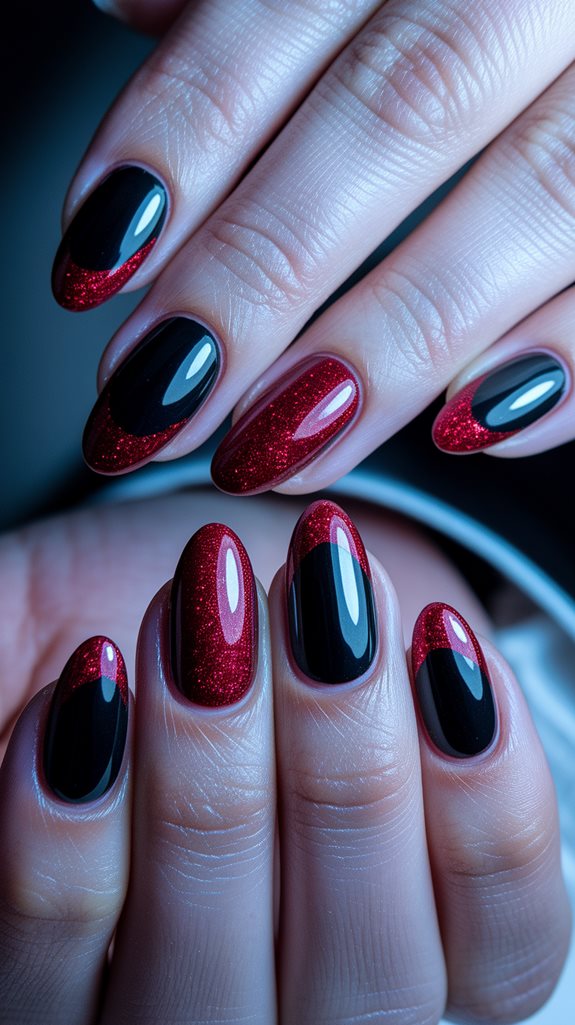
Turn your bold animal print nails into a dazzling masterpiece with glittery red and black accents. Start by protecting your nails with a base coat, then use a fine-tipped brush to outline the edges with black gel polish for precision.
After curing under an LED lamp, apply a red sparkle gel polish to selected sections and add glittery accents with loose red glitter for a vibrant glow.
Seal your design with a high-gloss top coat to ensure longevity and enhance the sparkle. The use of “Glam Red Glitter” can provide a professional sheen, creating a striking contrast that ensures your nails truly stand out.
This technique offers a unique and eye-catching finish that complements the boldness of animal print designs.
Red and Black Checkerboard Design

Transform your nails with a striking red and black checkerboard design, starting with a clean, prepared canvas. Apply a base coat to protect your natural nails, then use a high-quality red nail polish, like OPI’s Big Apple Red, as your base color.
Once dry, employ a striping brush dipped in a jet-black polish such as Essie’s Licorice to carefully paint small squares across each nail, ensuring even spacing.
Precision is key in nail art, so a detailing brush is useful for any touch-ups needed. Seal the design with a glossy top coat for long-lasting shine and durability.
This method results in a bold, sophisticated checkerboard pattern that captivates attention.
Red Hearts on Black Background
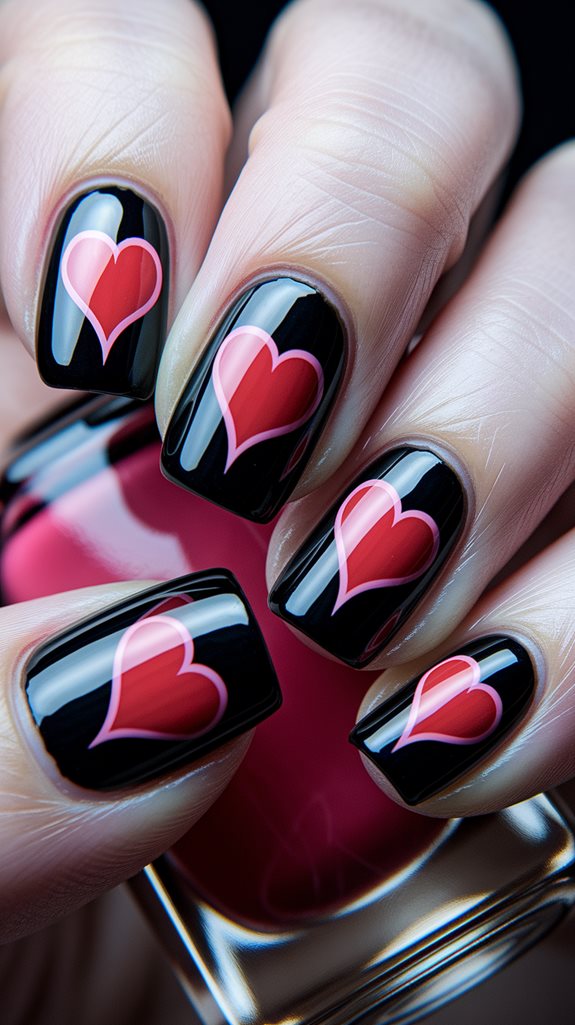
Explore the captivating allure of red hearts on a black background for a nail art design that exudes elegance and charm.
Begin by applying a high-quality base coat to safeguard your nails, followed by a smooth layer of jet-black polish for a strikingly dark canvas. Employ a precision nail art brush or dotting tool to create vibrant red hearts, ensuring each one is small and symmetrical.
For a lasting and glossy finish, a quick-dry top coat is recommended to seal and protect your artistic creation.
The combination of OPI’s “Black Onyx” and Essie’s “Really Red” promises a vivid contrast, ensuring your nail art remains eye-catching and refined. This design offers an effortlessly chic way to showcase your creativity and style.
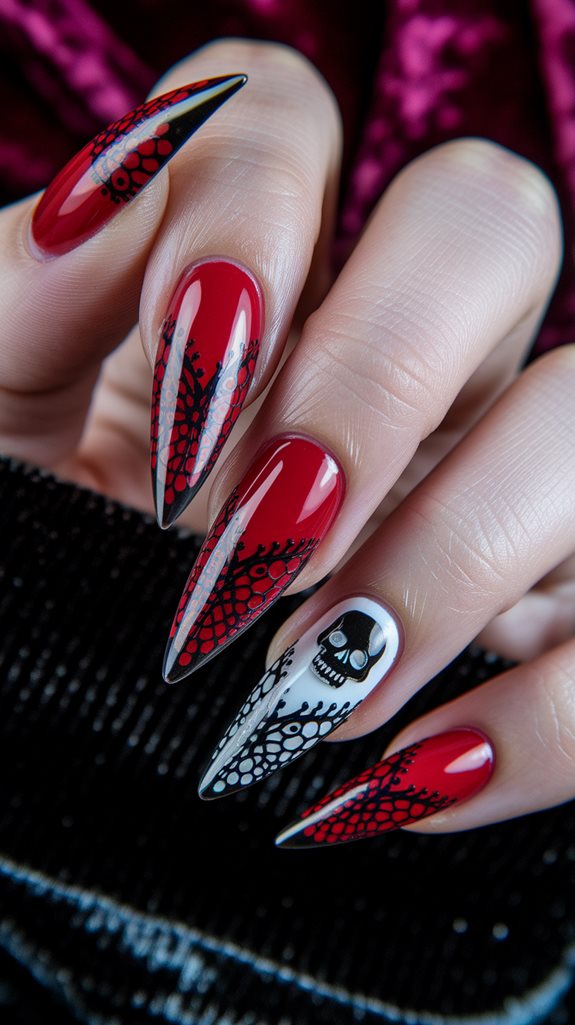
Black Lace Over Red
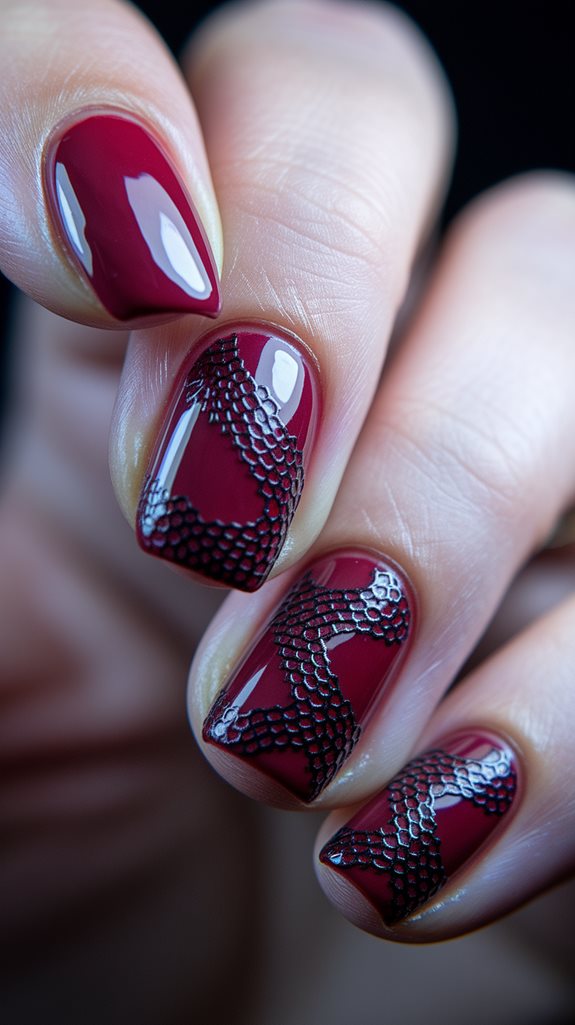
Enhance your nail art with the sophisticated allure of black lace contrasted against a vibrant red base.
Start with a quality red nail polish like OPI’s Big Apple Red for a bold backdrop. Once the base is dry, employ a fine detail brush or a nail stamping kit to craft intricate black lace designs, using brands like MoYou London for their excellent lace stamping plates.
Achieve precision by tidying up any excess polish with a small brush dipped in acetone.
Protect your detailed artwork by applying a glossy top coat such as Seche Vite to ensure a durable finish.
This black lace and red combination exudes a timeless elegance that’s sure to attract attention.
Red and Black Stripes
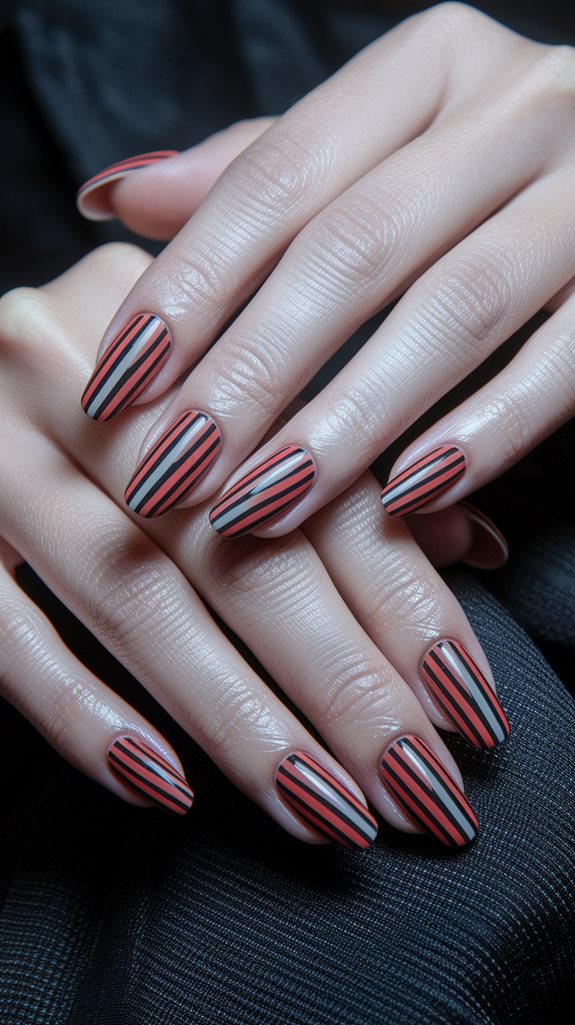
For a chic yet bold nail design, consider a striking pattern of red and black stripes.
Begin by applying a base coat to protect your nails. Once dry, use striping tape to create parallel lines and carefully paint black polish over the uncovered sections.
The alternating colors reflect red and black fashion trends, exuding confidence and elegance.
Remove the tape while the polish is still wet to achieve clean edges. Seal with a glossy top coat for a long-lasting finish, using a thin nail art brush for touch-ups if needed.
Red and Black Polka Dots
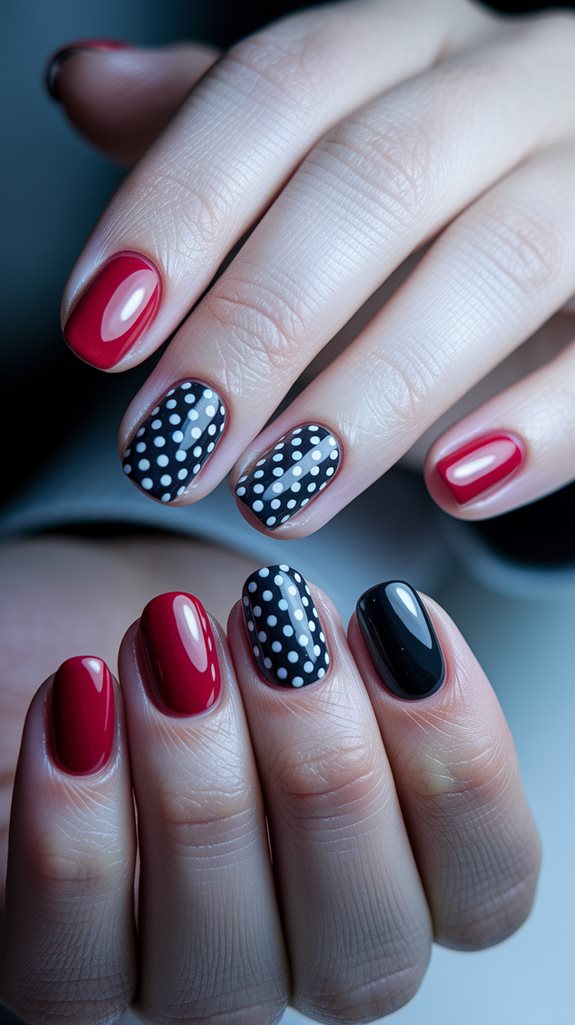
Red and black polka dots create a delightful fusion of playfulness and sophistication in nail design.
Begin with a protective base coat, followed by a vibrant red polish like OPI’s Big Apple Red. Once dried, carefully use a dotting tool to apply small black dots evenly with a polish such as Essie’s Licorice.
Seal your design with a glossy top coat for added durability.
This chic pattern pairs effortlessly with red and black accessories, making it an ideal complement to any red and black ensemble. Its whimsical yet elegant appeal suits both casual outings and sophisticated events, adding a stylish flair to any look.
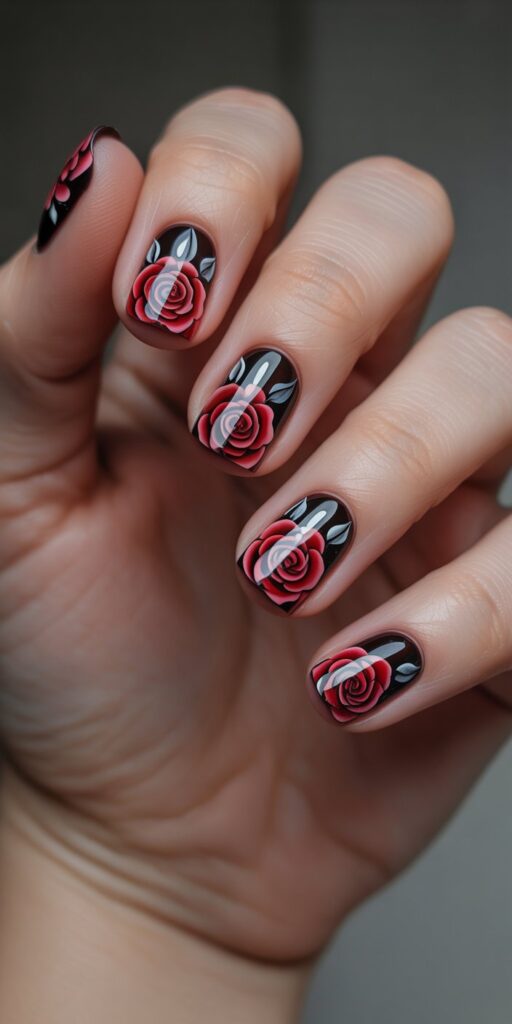
Red Base With Black Flowers
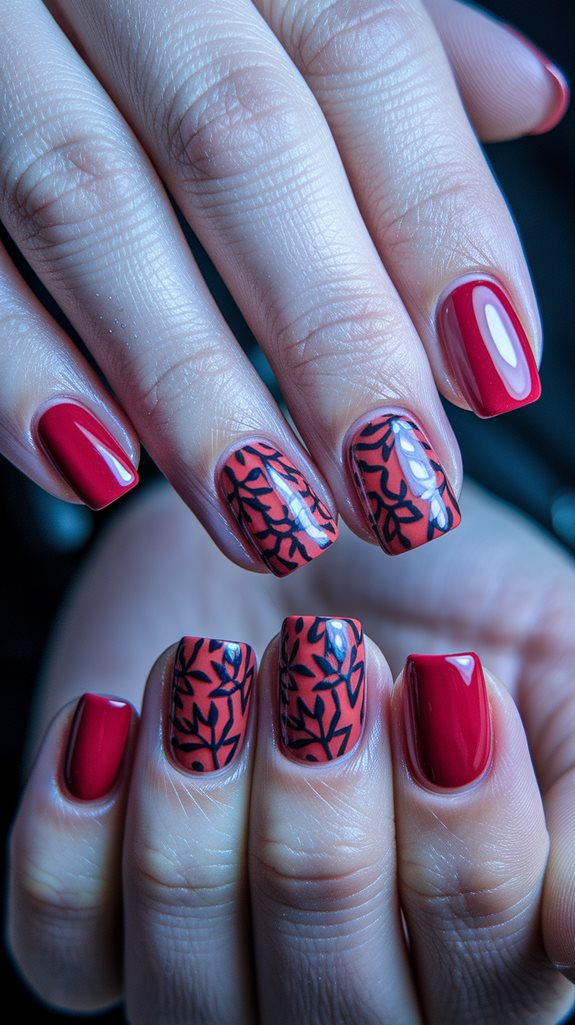
A red base paired with black floral designs exudes elegance and sophistication.
Begin with a vibrant red nail polish like OPI’s Big Apple Red as your foundation. Once dry, intricate floral patterns can be added using a fine-tipped brush with a precise black polish like Sally Hansen’s Blacky O.
The contrast between the bold red and the detailed black flowers creates a stunning visual effect. Delicate petals and leaves accentuate the overall design, making each flower stand out.
A glossy top coat, such as Essie’s Gel-Setter, adds shine and ensures the manicure’s durability.
Black Base With Red Flames
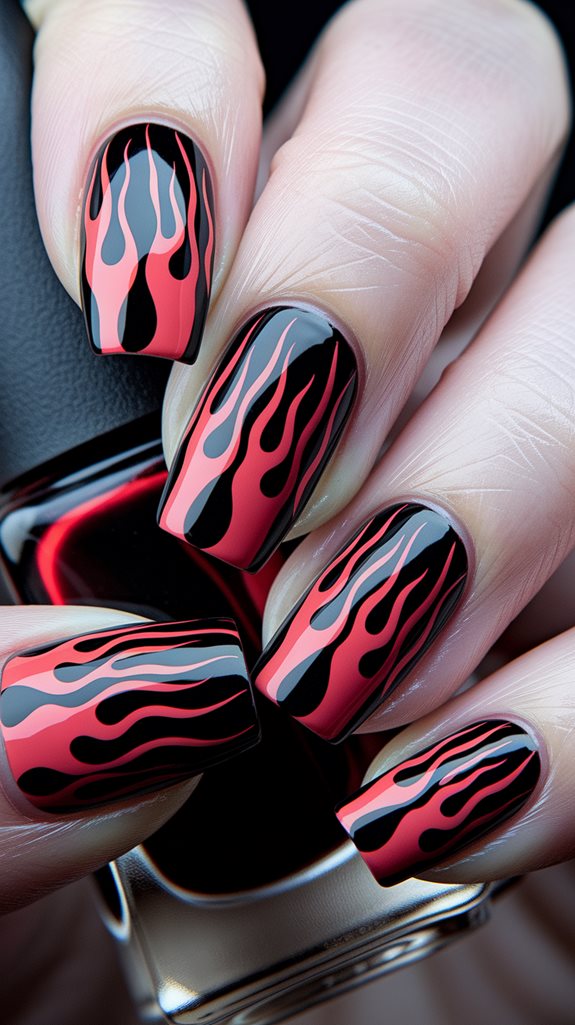
A black base with red flames design offers an edgy and captivating aesthetic.
Begin by applying a high-quality black gel polish, ensuring a rich and durable base. Create striking red flames using a thin nail art brush or a stamping kit for a dramatic contrast.
For a vibrant look, use shades like Gelish’s Hot Rod Red against the black backdrop. Draw the flames starting at the nail tip and move upwards for a fiery effect.
Finish with a glossy top coat to enhance shine and longevity, and clean the edges with acetone for a crisp finish.
Red and Black Gradient Nails
Explore the captivating world of red and black gradient nails, a fusion of energy and elegance. Red symbolizes vitality, while black exudes sophistication, creating a visually striking effect.
Understanding this color theory is key to mastering the art of gradient nails. For a seamless blend, use a makeup sponge to apply the colors. Start with a base coat to protect your nails, then paint overlapping stripes of red and black on the sponge.
Dab gently onto your nails until you reach the desired intensity, and finish with a top coat for a glossy finish. Consider using OPI’s “Big Apple Red” and Essie’s “Licorice” for a high-quality look.
Red and Black Tribal Art
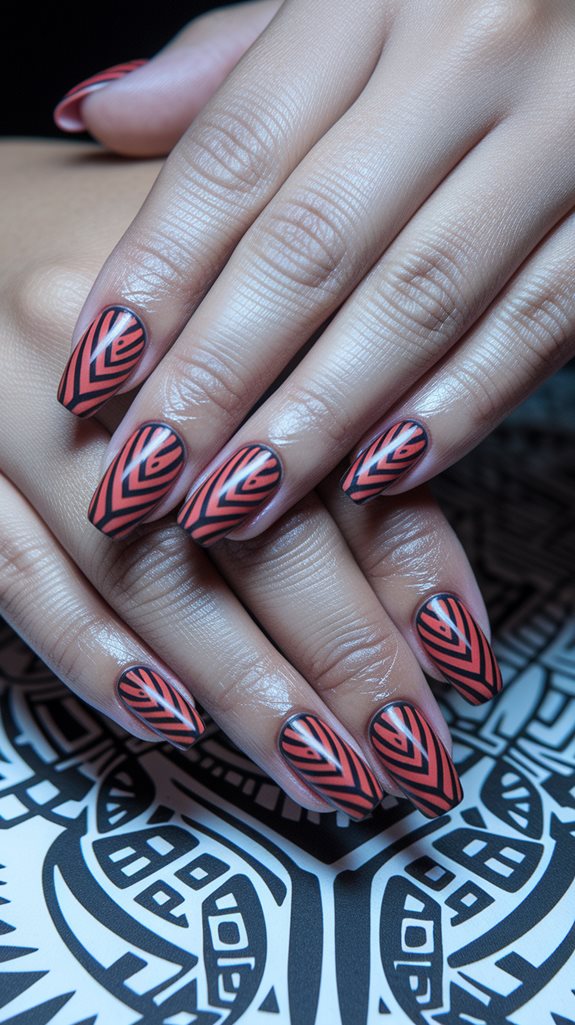
Creating stunning red and black tribal art on your nails starts with essential tools like a fine nail art brush and striping tape.
Begin with a protective base coat, followed by a vibrant red polish as the base color. Use striping tape to outline tribal patterns, ensuring precision and symmetry.
Paint over the tape with a high-pigment black polish using a fine nail art brush, and carefully remove the tape to reveal intricate designs.
These tribal patterns add visual intrigue while reflecting cultural significance, celebrating heritage and tradition.
Finish with a glossy top coat for durability and shine.
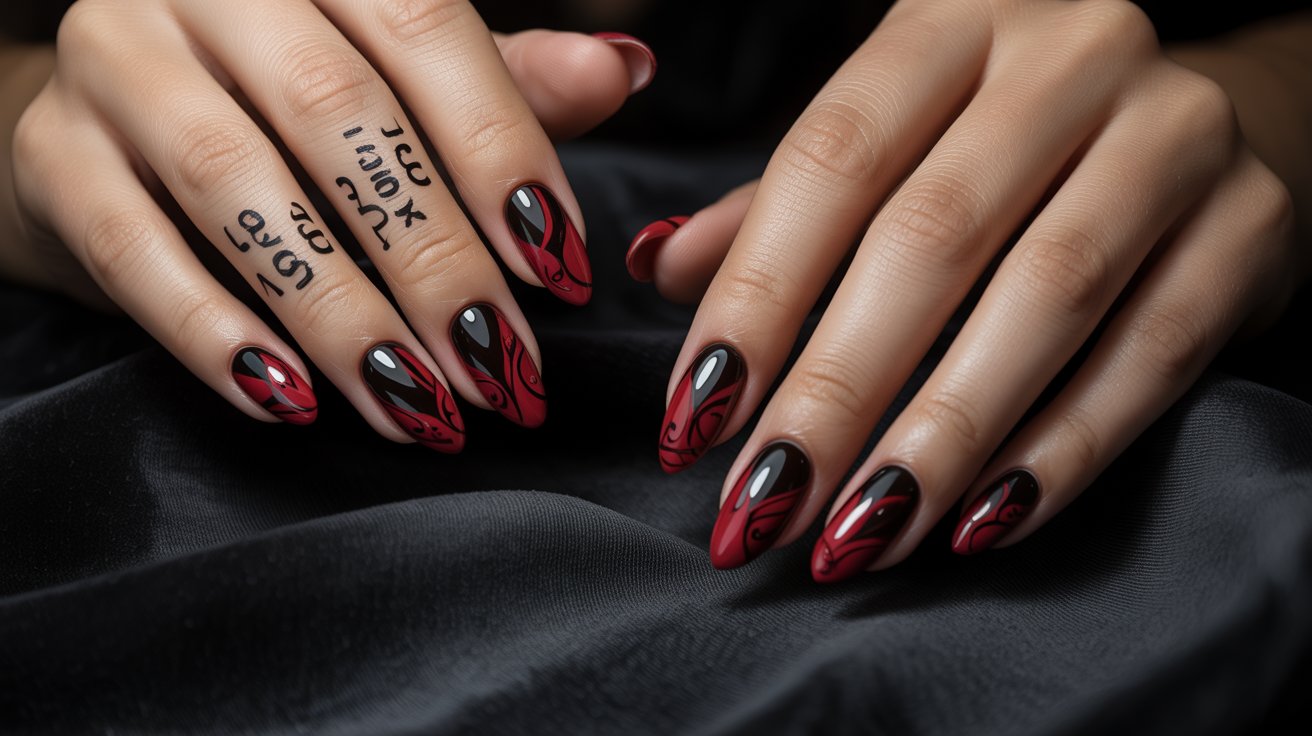
Red and Black Gothic Style
Dive into the dramatic world of red and black Gothic style nail art, where bold contrasts and intricate designs take center stage. Choose a deep, blood-red polish like Essie’s “Wicked” and pair it with the jet-black depth of OPI’s “Black Onyx”.
Use a fine-tipped nail brush to craft ornate swirls or lace-inspired motifs, bringing a touch of elegance to the dark theme. Embrace dark nail trends by applying matte top coats for a velvety finish.
Enhance the gothic appeal with stamping plates featuring baroque or filigree designs. Finish your artistic creation with a high-gloss top coat for lasting shine and use a nourishing cuticle oil, like CND’s SolarOil, to maintain nail health amidst your dark, alluring designs.
Elegant Red and Black Rhinestones
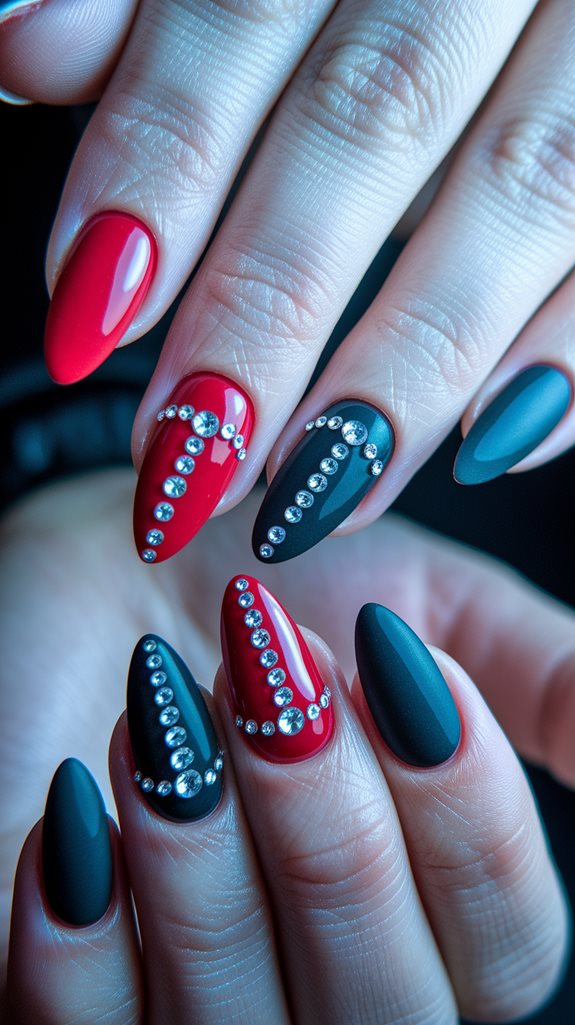
Elevate your nail art with the sophisticated allure of red and black rhinestones. Start by applying a base coat of deep black or rich red polish from premium brands like OPI or Essie for a polished look.
For an exquisite touch, opt for a mix of rhinestone sizes and shapes, such as round or teardrop crystals, ensuring a striking visual appeal.
Utilize nail glue or a precise adhesive pen to carefully position the rhinestones in an elegant pattern, such as a diagonal stripe or a clustered accent at the nail’s base.
Secure your design with a durable top coat like Seche Vite to enhance longevity.
For a flawless finish, use a nail art brush dipped in acetone to remove any excess adhesive, creating a clean and polished look.
Red and Black Abstract Art
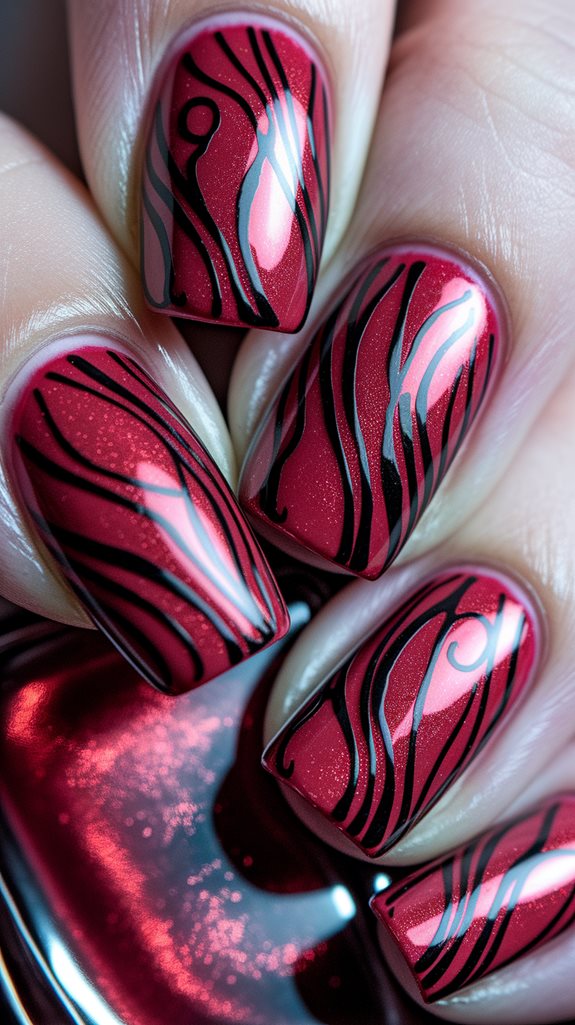
Red and black abstract nail art offers a striking and contemporary approach to nail design. Using techniques such as marbling or splatter effects, you can craft dynamic patterns that captivate and intrigue.
Bold color combinations like crimson and ebony can be enhanced with a fine detail brush, creating a visually stunning contrast.
Adding elements like contrasting dots or lines with a dotting tool can provide a unique touch to your design. A glossy top coat not only enhances the vibrant colors but also protects the art.
For precise lines, nail striping tape or stencils can be employed to refine your abstract masterpiece.
Red and Black Negative Space

Red and black negative space nail art exudes a striking balance between minimalism and boldness. Begin by applying a clear base coat to protect the nails, then use striping tape to define crisp negative space areas.
Select a high-pigment red polish, like OPI’s “Big Apple Red,” and a deep black, such as Essie’s “Licorice,” applying two thin coats on alternating sections for a vivid contrast.
Carefully remove the tape to reveal clean edges, and use a fine detail brush for any necessary touch-ups. A glossy top coat adds shine and durability, enhancing the design’s impact.
Balancing color distribution is key, allowing for experimentation with different negative space techniques to achieve a personalized look.
Red Roses With Black Stems
Red roses with black stems offer a striking blend of romance and sophistication, perfect for elevating any nail art design.
Begin by prepping your nails with a base coat to ensure the artwork lasts longer. Utilize a precision nail art brush to paint intricate black stems, using a high-pigment black polish like OPI’s “Black Onyx” for crisp and defined lines.
Next, add vibrant red roses using a dotting tool or detailed brush, choosing a rich red shade such as Essie’s “A-List” to enhance the romantic appeal.
Finish with a high-gloss top coat like Seche Vite for a long-lasting and polished look. This technique transforms your nails into a stunning canvas of timeless botanical beauty.
Red and Black Chevron Pattern
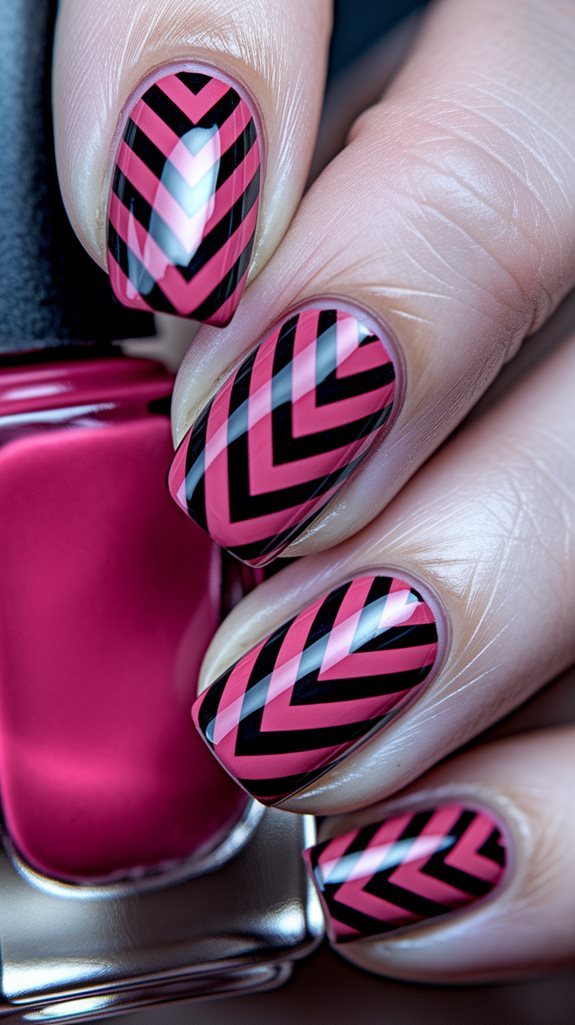
Chevron patterns infuse nail designs with a contemporary flair, blending boldness and elegance seamlessly.
Begin by choosing a high-quality red polish, such as OPI’s “Big Apple Red,” alongside a deep black like Essie’s “Licorice.” The red and black combination elicits a sense of passion and sophistication, making it ideal for those looking to make a striking impression.
Apply a base coat to protect your nails, then paint them red.
Once the red polish is dry, use striping tape to form a V-shaped chevron pattern and fill in alternating sections with black polish using a fine nail art brush.
For added creativity, consider varying the width of the stripes or incorporating glitter accents, and finish with a glossy top coat for a long-lasting, professional appearance.
Minimalist Red and Black Lines

For a sophisticated nail art look that exudes simplicity, consider minimalist designs using red and black lines.
Start by applying a protective clear base coat to your nails. Use a fine-tipped nail art brush to add subtle red accents along the nail’s edge for a touch of color.
Choose a highly pigmented black nail polish, like OPI Black Onyx, to create the black line art. Rest your wrist on a flat surface for stability and draw thin, parallel lines across the nail using a striping brush for precision.
Finish with a high-gloss topcoat such as Essie Good To Go for a sleek and polished appearance that’s both modern and easy to maintain.
Red and Black Plaid Design
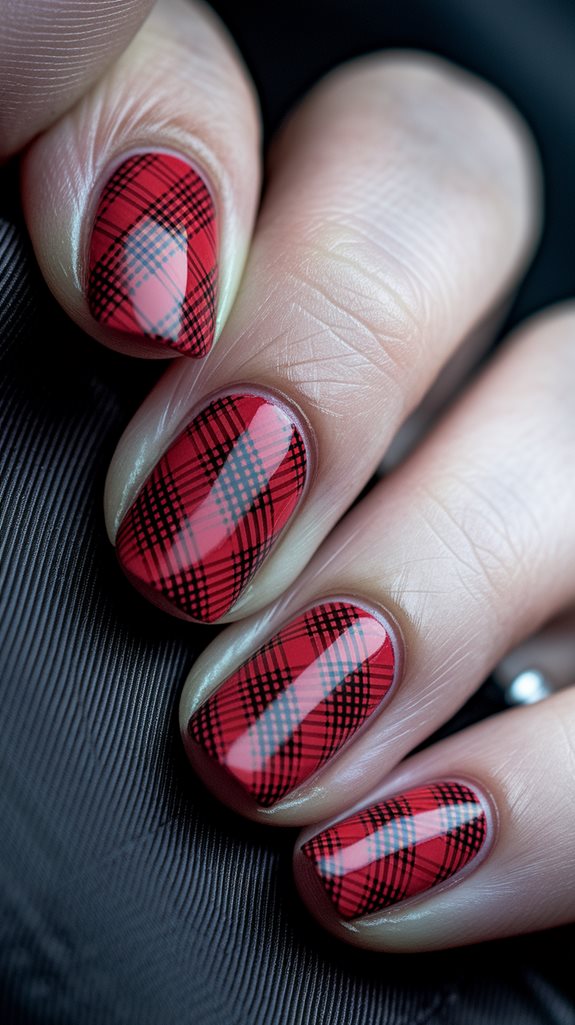
Achieving a striking red and black plaid design on your nails involves a few key steps.
Begin with a base coat to protect your nails and ensure the longevity of the design. Then, apply a rich red nail polish as your base color and allow it to dry completely.
For creating precise plaid patterns, use striping tape to form straight lines on your nails. Apply black polish over these taped areas to achieve the classic flannel look.
Carefully peel the tape away while the polish is still wet to reveal crisp lines, and if desired, add metallic accents with a nail art brush for a subtle shimmer.
Finish with a high-gloss topcoat to seal the design for a professional finish.
Red and Black Stiletto Nails

Red and black stiletto nails exude bold elegance and a touch of drama.
Start by shaping nails into sharp stiletto points with a fine-grit nail file, then apply a base coat to protect them.
Alternate between deep crimson red and glossy black polish for a striking look.
Add dimension by applying red and black glitter to the tips or creating intricate designs.
Finish with a high-gloss top coat like Seche Vite for durability and shine, and use a quick-dry spray to ensure the design sets flawlessly.
Red and Black Half Moon Manicure
The red and black half moon manicure offers a chic and contemporary spin on a timeless nail art style.
Start by applying a base coat, followed by a vibrant red polish like OPI’s Big Apple Red.
Once the red polish is completely dry, use a precision brush or half moon nail guides to create a crescent near the cuticle, which you’ll fill with a rich black polish such as Essie’s Licorice.
Remove any guides carefully to reveal the striking half moon pattern.
Finish off the look with a glossy top coat to enhance the shine and seal the design.
This manicure combines vintage elegance with a bold modern edge, making it perfect for those seeking a sophisticated and daring appearance.
Red and Black Reverse French Manicure
Elevate your nail game with the red and black reverse French manicure, a daring variation of the traditional French tip.
Start by applying a protective base coat, like OPI’s Nail Envy, to maintain nail health. Use a deep black polish, such as Essie’s Licorice, as the foundation, then let it dry completely.
Next, add a red crescent at the cuticle using a nail art brush for a striking reverse color effect. Brands like Sally Hansen’s Insta-Dri in Rapid Red are perfect for vivid coverage.
For precision, nail striping tape can be used to ensure clean lines. Finish with a glossy top coat like Seche Vite to enhance shine and durability, creating a look that radiates modern sophistication.